Terraform 入門
簡介
IaC
IaC (Infrastructure as Code) 是指將基礎設施的管理透過程式碼作為設定檔進行的一種方法。相較於從 GUI 操作,使用 IaC 工具可以讓基礎設施的建置、管理、變更等過程,更加的穩定、可延續、重複使用、簡單分享等等。
Terraform
Terraform 是其中一種 IaC 工具,透過被稱為 provider 的插件來使用不同平台或服務的 API,可以讓使用者管理不同平台的基礎設施,例如 AWS、GCP、Azure、Kubernetes 等等。
另外,Terraform 會記錄並追蹤每個資源的狀態,用於判斷設定檔與實際狀態的差異,來決定什麼部分的資源需要建立或變更。
Terraform 的使用流程可以參考以下這張官方文件內的圖片:
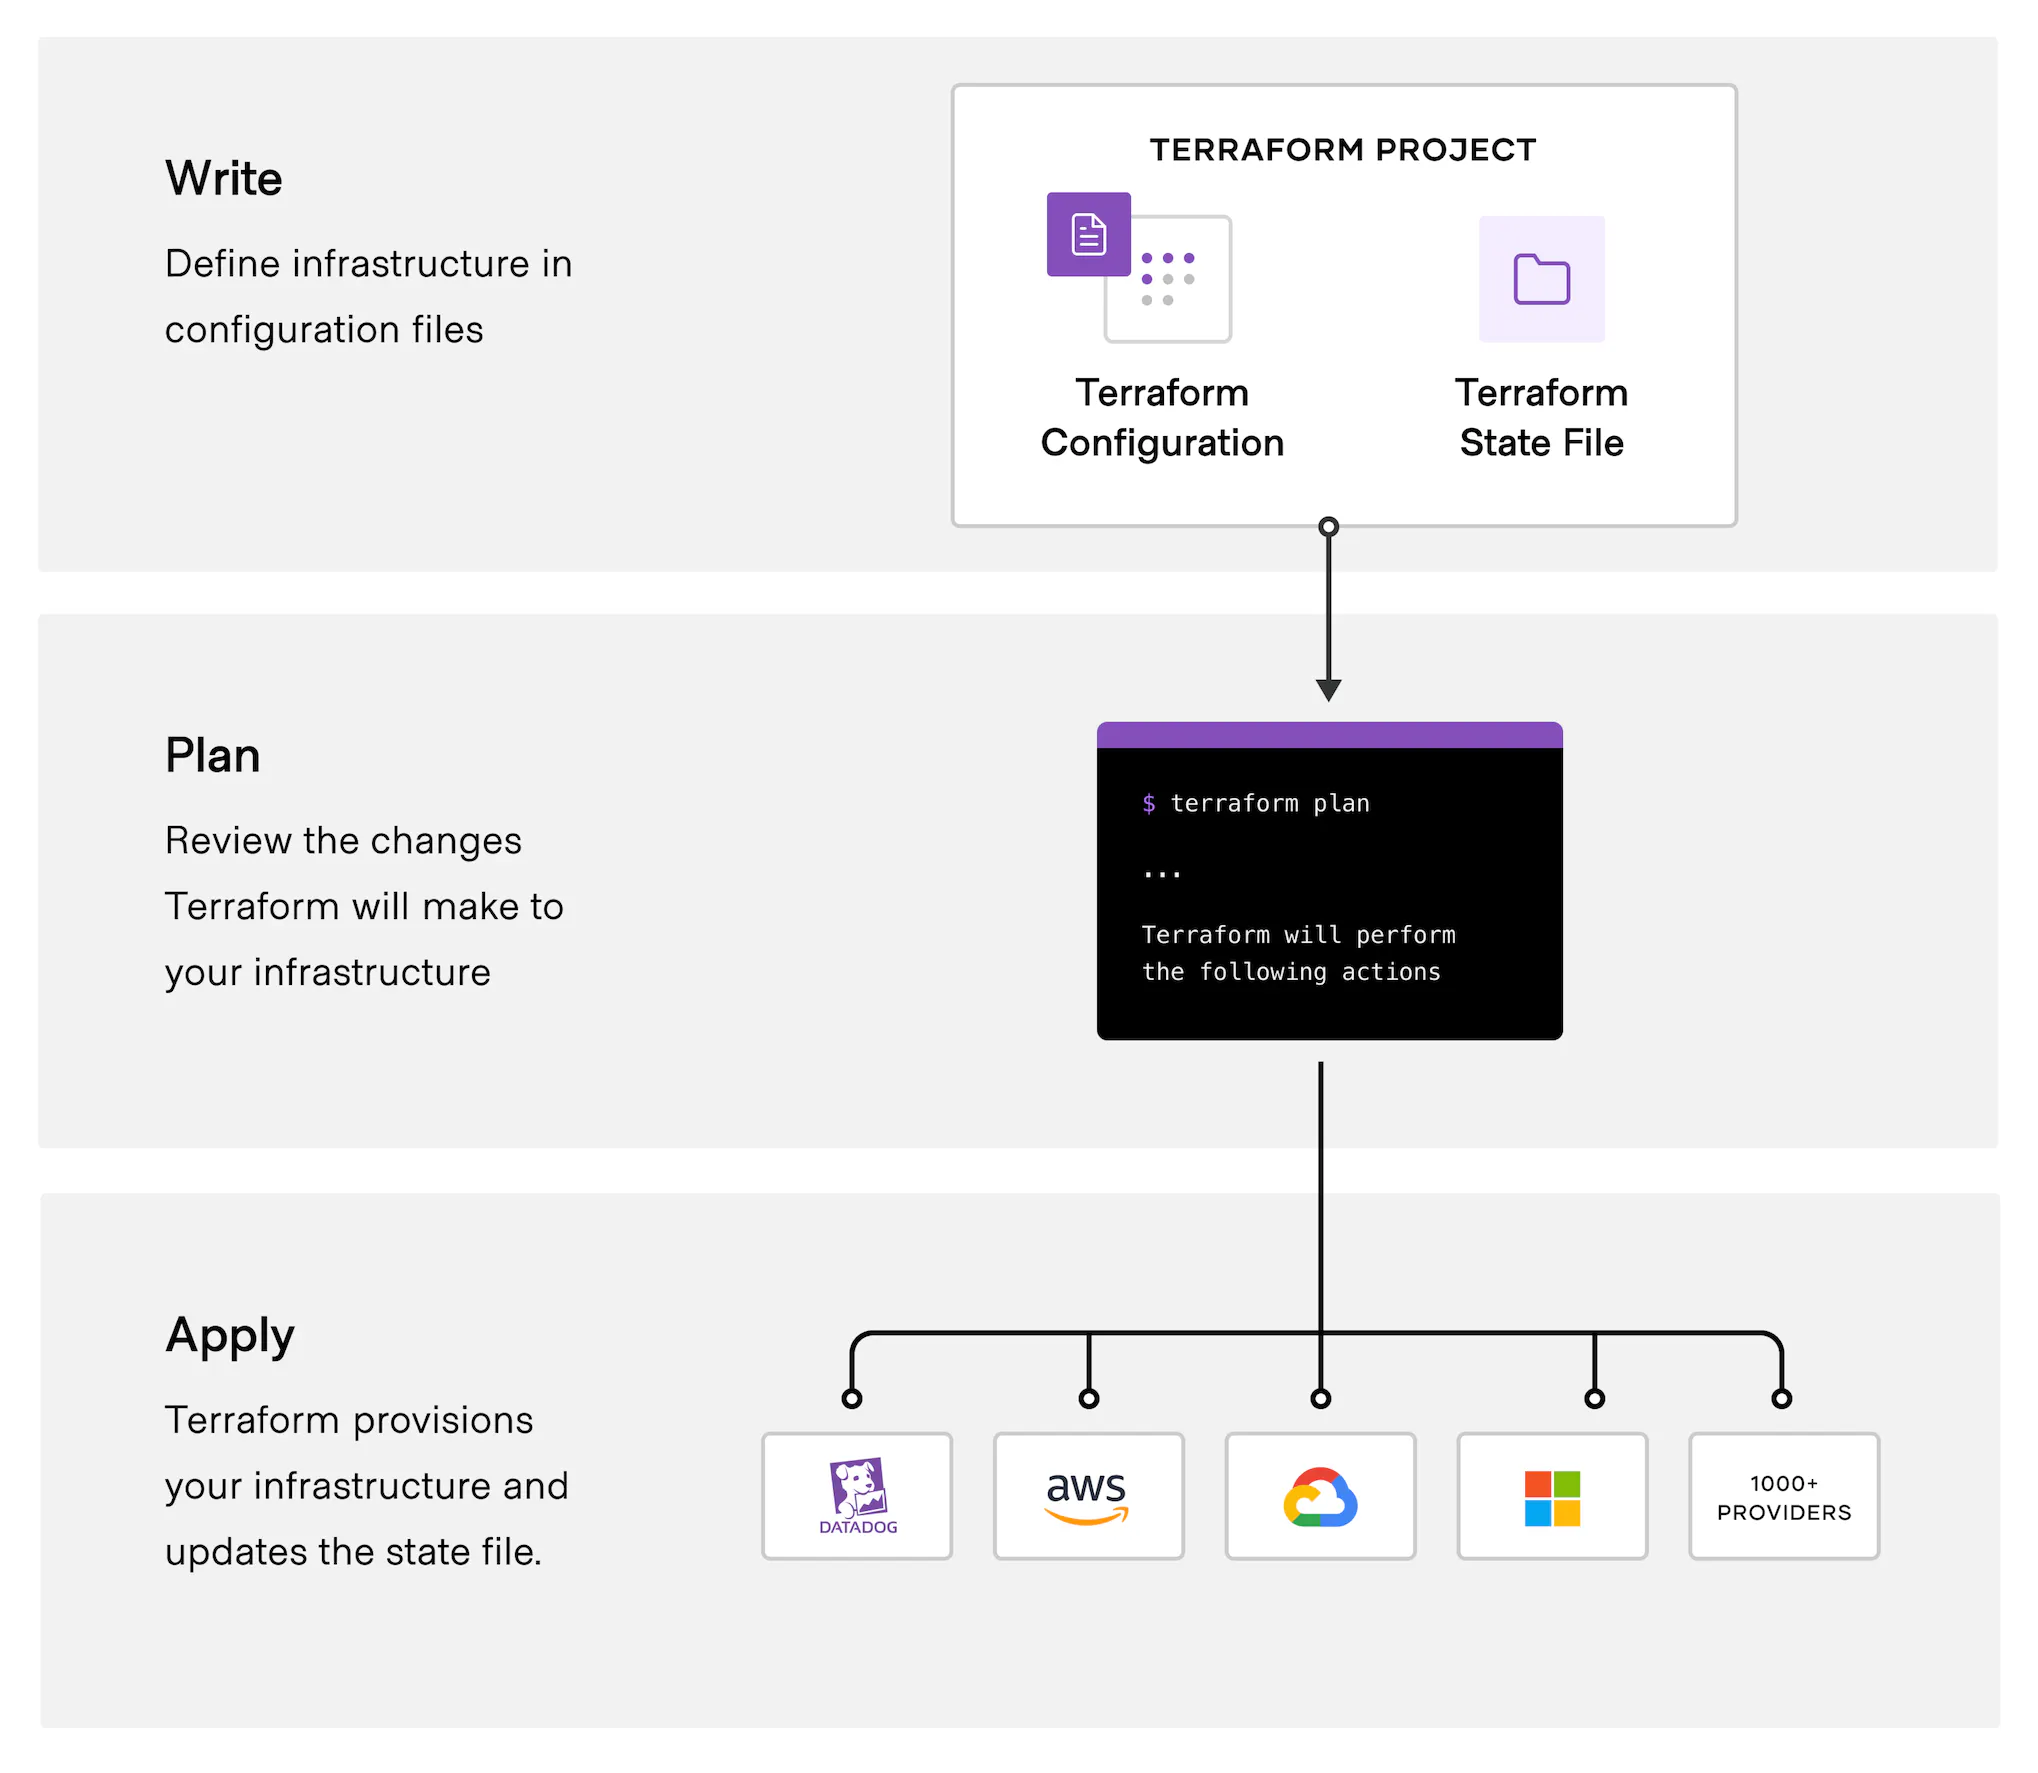
- Plan: 透過狀態的比對,將設定檔轉換成執行計畫,並且顯示出需要變更部分。
- Apply: 將計畫執行所描述的變更實際套用到資源上。
實際操作
如何透過 Terraform 操作 Azure 上的資源
安裝
- Terraform 的安裝可以參考官方文件的 Install Terraform 這篇文章。
- Azure 的部分也使用 Azure CLI,參考 How to install the Azure CLI 這篇文章
1. 驗證
驗證方式有很多種,直接登入 Azure CLI 也能作為驗證的方式,但這邊採用實務使用上比較建議的方式,透過 service principal 驗證。
登入 Azure CLI
# 登入
$ az login
# 設定要使用的訂用帳戶
$ az account set --subscription "<SUBSCRIPTION_ID>"
建立 service principal,terraform 會使用這個 service principal 來操作 Azure 資源
$ az ad sp create-for-rbac --name "terraform" \
--role="Contributor" \
--scopes="/subscriptions/<SUBSCRIPTION_ID>"

# 會得到以下的結果
{
  "appId": "xxxxxx-xxx-xxxx-xxxx-xxxxxxxxxx",
  "displayName": "terraform",
  "password": "xxxxxx~xxxxxx~xxxxx",
  "tenant": "xxxxx-xxxx-xxxxx-xxxx-xxxxx"
}
將產生的 appId、password、tenant 設定在環境變數中,供 Terraform 使用(以 Powershell 為例):
$ $Env:ARM_CLIENT_ID = "<APPID_VALUE>"
$ $Env:ARM_CLIENT_SECRET = "<PASSWORD_VALUE>"
$ $Env:ARM_SUBSCRIPTION_ID = "<SUBSCRIPTION_ID>"
$ $Env:ARM_TENANT_ID = "<TENANT_VALUE>"
2. 建立設定檔
建立專案資料夾,並且在裡面建立 main.tf 檔案加入以下內容:
terraform {
  required_providers {
    azurerm = {
      source  = "hashicorp/azurerm"
      version = "3.38.0"
    }

  }
}

provider "azurerm" {
  features {}
}
terraform 區塊用來設定 Terraform,例如這邊的 required_providers 區塊,用來設定使用的 provider 及版本。
provider 區塊用來設定 provider 的相關設定,設定在環境變數中的認證資訊也可以在這邊設定。
provider "azurerm" {
  features {}
  client_id = "xxxxxxxx-xxxx-xxxx-xxxx-xxxxxxxxxxxx"
  client_secret = "xxxxxxxx-xxxx-xxxx-xxxx-xxxxxxxxxxxx"
  tenant_id = "xxxxxxxx-xxxx-xxxx-xxxx-xxxxxxxxxxxx"
  subscription_id = "xxxxxxxx-xxxx-xxxx-xxxx-xxxxxxxxxxxx"
}
設定好 provider 後就可以使用 terraform init 來初始化 Terraform。
3-1. 使用情境:建立資源
完成前面的認證以及基礎設定後就可以來定義並建立資源了,一樣在 main.tf 檔案內,加入以下設定:
resource "azurerm_resource_group" "demo1_rg" {
  name     = "try-terraform-rg1"
  location = "eastus"
}
Terraform 的資源由 resource 區塊進行定義,在 resource 字之後接著兩個字串,第一個是資源類型,第二是資源名稱,接著才是資源的設定區塊。資源類型以及資源名稱透過 “.” 組合起來就是這個資源在 Terraform 內的 “resource id”,在同一份設定檔內是不能夠重複的。
資源類型的列表以及詳細設定參數可以從 Terraform registry 的文件內找到,例如:azurerm
以上方的資源為例,這個設定描述了一個 azurerm_resource_group.demo1_rg 資源,代表著一個 azure resource group 且這個 resource group 名稱設定為 “try-terraform-rg1”,地區為 “eastus”。
設定完成後,就可以透過 Terraform 的 CLI 進行檢查以及資源建立:
# 檢查設定檔格式
$ terraform fmt

# 驗證設定檔
$ terraform validate

Success! The configuration is valid.

# 建立執行計畫
$ terraform plan

Terraform used the selected providers to generate the following execution plan. Resource actions are indicated with the following symbols:
  + create

Terraform will perform the following actions:

  # azurerm_resource_group.demo1_rg will be created
  + resource "azurerm_resource_group" "demo1_rg" {
      + id       = (known after apply)
      + location = "eastus"
      + name     = "try-terraform-rg1"
    }

Plan: 1 to add, 0 to change, 0 to destroy.
# 套用變更
$ terraform apply

# 略過輸出...
成功建立後便可以進行檢查
$ az group list

[
  {
    "id": "/subscriptions/xxxxxxxx-xxxx-xxxx-xxxx-xxxxxxxxxxxx/resourceGroups/try-terraform-rg1",
    "location": "eastus",
    "managedBy": null,
    "name": "try-terraform-rg1",
    "properties": {
      "provisioningState": "Succeeded"
    },
    "tags": {},
    "type": "Microsoft.Resources/resourceGroups"
  }
]
接著試著建立第二個資源,一樣在 main.tf 內加上:
resource "azurerm_storage_account" "demo_storage" {
  name                     = "trytfstorage20230116"
  resource_group_name      = azurerm_resource_group.demo1_rg.name
  location                 = azurerm_resource_group.demo1_rg.location
  account_tier             = "Standard"
  account_replication_type = "LRS"
}
前面提到的 resourec id 可以提供其他的資源進行參照,例如這裡的 azurerm_storage_account.demo_storage 在設定區塊的 resource_group_name, location 這兩個參數上使用了 azurerm_resource_group.demo1_rg 的屬性。這除了方便重複使用設定值之外,Terraform 也會依照彼此的參照來確定依賴關係,所以即使 resource group 和 storage account 沒有分批進行 terraform apply ,也不會出現 storage account 要建立時沒有對應 resource group 的情形。
同樣透過 CLI 套用經過變更的設定檔:
$ terraform plan
# apply 時可以透過加上 -auto-approve 選項來略過使用者檢查以及輸入 'yes' 的要求
$ terraform apply -auto-approve
完成後可以透過 azure cli 檢查:
$ az storage account show --name trytfstorage20230116
也可以列出 Terraform 目前管理的 state,目前應該會有 azurerm_resource_group.demo1_rg 以及 azurerm_storage_account.demo_storage:
$ terraform state list

azurerm_resource_group.demo1_rg
azurerm_storage_account.demo_storage
3-2. 使用情境:修改資源
即使資源已經被建立了,修改的方式也很簡單,可以直接透過修改 Terraform 設定檔來達成:
resource "azurerm_storage_account" "demo_storage" {
  name                     = "trytfstorage20230116"
  resource_group_name      = azurerm_resource_group.demo1_rg.name
  location                 = azurerm_resource_group.demo1_rg.location
  account_tier             = "Standard"
  # 修改 replication type
  account_replication_type = "GRS"
}
接著一樣建立執行計畫:
$ terraform plan

# 會得到以下輸出結果
Terraform used the selected providers to generate the following execution plan. Resource actions are indicated with the following symbols:
  ~ update in-place

Terraform will perform the following actions:

  # azurerm_storage_account.demo_storage will be updated in-place
  ~ resource "azurerm_storage_account" "demo_storage" {
      ~ account_replication_type          = "LRS" -> "GRS"
        id                                = "/subscriptions/xxxxxxxx-xxxx-xxxx-xxxx-xxxxxxxxxxxx/resourceGroups/try-terraform-rg1/providers/Microsoft.Storage/storageAccounts/trytfstorage20230116"
        name                              = "trytfstorage20230116"
        tags                              = {}
        # (36 unchanged attributes hidden)

        # (4 unchanged blocks hidden)
    }

Plan: 0 to add, 1 to change, 0 to destroy.
可以看到,Terraform 透過先前的執行紀錄以及結果,可以在設定檔被更改後知道要如何調整資源。特定情境下,已建立的資源無法被更新而是只能重新建立,Terraform 也可以處理,例如:
resource "azurerm_storage_account" "demo_storage" {
  name                     = "trytfstorage20230116"
  resource_group_name      = azurerm_resource_group.demo1_rg.name
  location                 = azurerm_resource_group.demo1_rg.location
  account_tier             = "Standard"
  # 修改 replication type => "ZRS"
  account_replication_type = "ZRS"
}
會得到以下結果:
$ terraform plan

Terraform used the selected providers to generate the following execution plan. Resource actions are indicated with the following symbols:
-/+ destroy and then create replacement

Terraform will perform the following actions:

  # azurerm_storage_account.demo_storage must be replaced
-/+ resource "azurerm_storage_account" "demo_storage" {
      ~ access_tier                       = "Hot" -> (known after apply)
      ~ account_replication_type          = "LRS" -> "ZRS" # forces replacement
      # 略過其餘內容
    }

Plan: 1 to add, 0 to change, 1 to destroy.
確定好更動的內容後一樣執行 terraform apply 就可以套用變更。
3-3. 使用情境:匯入資源
如果有資源是透過其他方式(例如 Azure Portal)建立,但又希望可以整合進 Terraform 設定檔中,可以使用 terraform import 的指令進行匯入:
$ terraform import -h
Usage: terraform [global options] import [options] ADDR ID

# ADDR 為該資源的匯入目標位置,也就是設定檔內特定的 resource id
# ID   為匯入的來源位置,也就是 Azure 上的 resource id
因此在執行 import 之前,必須先在 Terraform 設定檔中建立對應的資源區塊,這邊以 keyvault 資源為例,在 main.tf 內加上:
resource "azurerm_key_vault" "demo_kv" {

}
有了 Terraform 的 resource id 後,接著要找到在 Azure 上這個既有資源的 resource id,從 Azure Portal 選擇到這一個 Keyvaul 資源後,在 overview 頁面的 “JSON View” 內,可以看到 resource id,會是這個格式:
/subscriptions/xxxxxxxx-xxxx-xxxx-xxxx-xxxxxxxxxxxx/resourceGroups/try-terraform-rg1/providers/Microsoft.KeyVault/vaults/try-terraform-kv
有了以上兩組 resource id,就可以進行匯入:
$ terraform import azurerm_key_vault.demo_kv "/subscriptions/xxxxxxxx-xxxx-xxxx-xxxx-xxxxxxxxxxxx/resourceGroups/try-terraform-rg1/providers/Microsoft.KeyVault/vaults/try-terraform-kv"

# 輸出
azurerm_key_vault.demo_kv: Importing from ID "/subscriptions/xxxxxxxx-xxxx-xxxx-xxxx-xxxxxxxxxxxx/resourceGroups/try-terraform-rg1/providers/Microsoft.KeyVault/vaults/try-terraform-kv"...
azurerm_key_vault.demo_kv: Import prepared!
  Prepared azurerm_key_vault for import
azurerm_key_vault.demo_kv: Refreshing state... [id=/subscriptions/xxxxxxxx-xxxx-xxxx-xxxx-xxxxxxxxxxxx/resourceGroups/try-terraform-rg1/providers/Microsoft.KeyVault/vaults/try-terraform-kv]

Import successful!

The resources that were imported are shown above. These resources are now in
your Terraform state and will henceforth be managed by Terraform.
執行 import 後,Terraform 會將指定的資源加入狀態追蹤:
$ terraform state list
azurerm_key_vault.demo_kv
azurerm_resource_group.demo1_rg
azurerm_storage_account.demo_storage
但並不會自動複寫設定檔,因此需要手動從 Terraform 追蹤的狀態內將需要的設定值加入設定檔,可以透過 terraform show 來列出目前追蹤的所有狀態,或是透過 terraform state show <RESOURCE ID> 來列出特定的狀態:
$ terraform state show azurerm_key_vault.demo_kv

# 僅列出部分輸出內容
# azurerm_key_vault.demo_kv:
resource "azurerm_key_vault" "demo_kv" {
    id                              = "/subscriptions/xxxxxxxx-xxxx-xxxx-xxxx-xxxxxxxxxxxx/resourceGroups/try-terraform-rg1/providers/Microsoft.KeyVault/vaults/try-terraform-kv"
    location                        = "eastus"
    name                            = "try-terraform-kv"
    public_network_access_enabled   = true
    purge_protection_enabled        = false
    resource_group_name             = "try-terraform-rg1"
    sku_name                        = "standard"
    soft_delete_retention_days      = 90
    tags                            = {}
    tenant_id                       = "xxxxxxxx-xxxx-xxxx-xxxx-xxxxxxxxxxxx"
    vault_uri                       = "https://try-terraform-kv.vault.azure.net/"
}
接著可以直接複製設定區塊的內容,加入 main.tf 設定檔中:
resource "azurerm_key_vault" "demo_kv" {
  id                              = "/subscriptions/xxxxxxxx-xxxx-xxxx-xxxx-xxxxxxxxxxxx/resourceGroups/try-terraform-rg1/providers/Microsoft.KeyVault/vaults/try-terraform-kv"
    location                        = "eastus"
    name                            = "try-terraform-kv"
    public_network_access_enabled   = true
    purge_protection_enabled        = false
    resource_group_name             = "try-terraform-rg1"
    sku_name                        = "standard"
    soft_delete_retention_days      = 90
    tags                            = {}
    tenant_id                       = "xxxxxxxx-xxxx-xxxx-xxxx-xxxxxxxxxxxx"
    vault_uri                       = "https://try-terraform-kv.vault.azure.net/"
}
然後透過 validate 來驗證,有些設定參數只應該出現在被追蹤的狀態內,無法直接寫在資源設定中:
$ terraform validate

# 僅列出部分輸出內容
╷
│ Error: Invalid or unknown key
│
│   with azurerm_key_vault.demo_kv,
│   on main.tf line 32, in resource "azurerm_key_vault" "demo_kv":
│   32:   id                            = "/subscriptions/xxxxxxxx-xxxx-xxxx-xxxx-xxxxxxxxxxxx/resourceGroups/try-terraform-rg1/providers/Microsoft.KeyVault/vaults/try-terraform-kv"
透過這些錯誤訊息,可以把不正確的參數、選擇性參數移除,留下來的會是這樣:
resource "azurerm_key_vault" "demo_kv" {
  location            = azurerm_resource_group.demo1_rg.location
  name                = "try-terraform-kv"
  resource_group_name = azurerm_resource_group.demo1_rg.name
  sku_name            = "standard"
  tenant_id           = "xxxxxxxx-xxxx-xxxx-xxxx-xxxxxxxxxxxx"
}
確認 validate 沒有錯誤訊息後可以利用 plan 來確認設定檔是否與狀態符合:
$ terraform plan

azurerm_resource_group.demo1_rg: Refreshing state... [id=/subscriptions/xxxxxxxx-xxxx-xxxx-xxxx-xxxxxxxxxxxx/resourceGroups/try-terraform-rg1]
azurerm_key_vault.demo_kv: Refreshing state... [id=/subscriptions/xxxxxxxx-xxxx-xxxx-xxxx-xxxxxxxxxxxx/resourceGroups/try-terraform-rg1/providers/Microsoft.KeyVault/vaults/try-terraform-kv]
azurerm_storage_account.demo_storage: Refreshing state... [id=/subscriptions/xxxxxxxx-xxxx-xxxx-xxxx-xxxxxxxxxxxx/resourceGroups/try-terraform-rg1/providers/Microsoft.Storage/storageAccounts/trytfstorage20230116]

No changes. Your infrastructure matches the configuration.

Terraform has compared your real infrastructure against your configuration and found no differences, so no changes are needed.
顯示沒有異動需要被套用,就代表匯入成功。
4. 刪除資源
當使用結束,不再需要設定檔內的資源時,可以透過指令將資源全部刪除:
$ terraform destroy

# 僅列出部分輸出內容
Plan: 0 to add, 0 to change, 3 to destroy.

Do you really want to destroy all resources?
  Terraform will destroy all your managed infrastructure, as shown above.
  There is no undo. Only 'yes' will be accepted to confirm.
輸入 yes 後就可以刪除所有的資源了。